Showing posts with label dessert. Show all posts

Tuesday, August 6, 2013

Cake Mix Rice Krispy Bars with Salted Caramel and Homemade Marshmallow Frosting


Cake Mix Rice Krispy Bars with Salted Caramel and Homemade Marshmallow Fluff

a.k.a. the dessert with the longest name ever

But that's what makes it great: if you say its name a few times, you burn enough calories to make up for the calories you just consumed :)

I am entering these Cake Mix Rice Krispy Bars with Salted Caramel and Homemade Marshmallow Fluff in the Creative Recipe Contest hosted by Confessions of a Cookbook Queen and Cookies and Cups.

I was inspired by Shelly's Caramel Stuffed Krispie Treats. I thought, why not take the textures and flavors of rice krispie treats and caramel and put them into a bar. Made with a cake mix. So easy and delicious!


The bar starts out with a cake mix and has rice krispies for a nice crunch. Add a to-die-for salted caramel layer, and top it off with a homemade marshmallow fluff, and you've got one amazing dessert!

Cake Mix Bar
1 box white cake mix
2 eggs
1/2 cup butter, softened
2 cups rice krispy cereal

Preheat oven to 350 degrees. Mix together the cake mix, eggs, and butter until well combined. Stir in the rice krispy cereal. Press the dough into a greased 9 x 13" pan. Bake for 20 minutes. The edges should be golden brown. Let cool completely before spreading on the caramel and marshmallow fluff.

Salted Caramel
1 cup brown sugar
1/2 cup whipping cream
4 tablespoons butter
1/2 teaspoon salt
2 teaspoons vanilla

Mix all ingredients except for the vanilla in a small saucepan and cook over medium low heat. Stir frequently and cook until it bubbles. Stir in the vanilla and remove from heat. Allow the caramel to cool for a few minutes before pouring it into a bowl and refrigerating it.

Adapted from The Pioneer Woman

Marshmallow Fluff
1 1/2 cups sugar
1/2 teaspoon cream of tartar
1/2 cup water
3 egg whites, room temperature
1 teaspoon vanilla extract

Mix together the sugar, cream of tartar, and water in a saucepan over medium high heat. Stir constantly until the sugar dissolves. Then let the mixture boil without stirring until it reaches 240 degrees. While the mixture is boiling, beat the egg whites in a stand mixer until they reach soft peaks. Once the sugar mixture reaches 240 degrees, pour it in a small, steady stream into the bowl with the egg whites with the beater going. Add in the vanilla and continue beating until stiff peaks form.

Adapted from cooks.com

Once the bars are completely cool, spread the cooled caramel over it. Spread the marshmallow fluff over the caramel. Cut into squares and enjoy! Store in the fridge.

Thursday, August 1, 2013

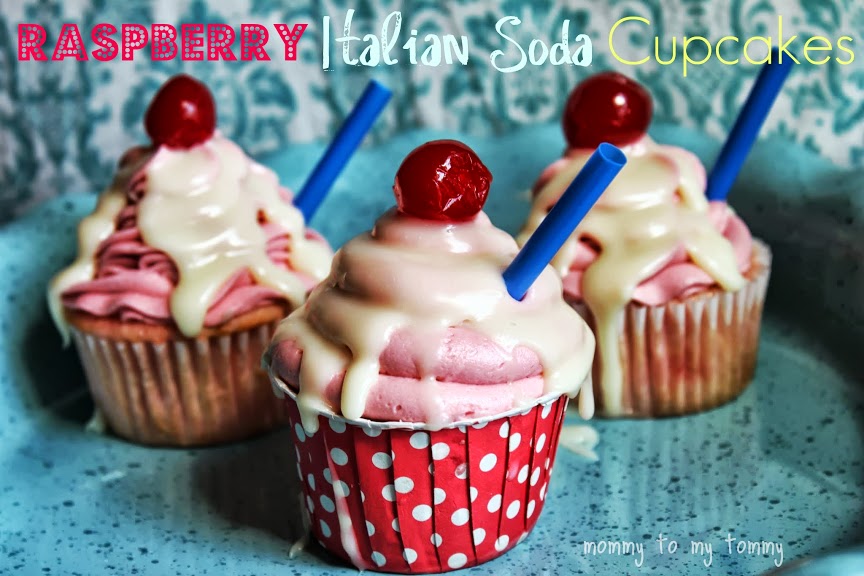
Raspberry Italian Soda Cupcakes


I am entering these Raspberry Italian Soda Cupcakes in the Creative Recipe Contest hosted by Confessions of a Cookbook Queen and Cookies and Cups.
 
Raspberry Italian sodas and me go way back. So in homage of my beverage bestie, I made these cupcakes!
 
The cupcake batter swirls together like the raspberry syrup and cream in an Italian soda. The raspberry frosting is sweetly delicious. And the white chocolate ganache mimics the way the cream is poured on top of the Italian soda.
 
Make these today and you'll have a new best friend :)
 
 
Raspberry Italian Soda Cupcakes
 
Cupcakes:
16.5 oz box of white cake mix
1 1/2 cups (or 12 oz can) of club soda
1/4 cup whipping cream
1/4 cup raspberry syrup (I used Torani brand)
 
Preheat oven to 350 degrees. Mix together the cake mix and club soda. Divide the batter into two bowls. In one bowl, stir in the cream. And in the other bowl, stir in the raspberry syrup. Pour one bowl of batter into the other bowl, and stir just a few times. You want to swirl the colors, but not mix them together. Fill muffin tins 2/3 full, and bake for 15 minutes. Let cool completely before decorating.
 
Raspberry Frosting:
2 sticks of butter, room temperature
6 tablespoons of raspberry syrup
4 cups powdered sugar
Red food coloring (optional)
 
Cream together the butter, raspberry syrup, and food coloring (if using). Add the powdered sugar, a little at a time. Once all of the powdered sugar is added, beat on high for about two minutes.
 
White Chocolate Ganache:
1/2 cup white chocolate chips
2 tablespoons whipping cream
 
Put the white chocolate chips and whipping cream in a microwave-safe bowl. Microwave in 15 second intervals and stir after each 15 seconds until the chocolate chips are melted and the ganache is smooth. Let the ganache cool to room temperature before using.
 
Pipe the frosting onto the cupcakes. Drizzle the ganache over the cupcakes and top with a cherry. Enjoy!
 
Adapted from  Cherry Vanilla Dr. Pepper Cupcakes by Confessions of a Cookbook Queen


Tuesday, July 30, 2013

Cinnamon Spice Zucchini Cookies


It's summertime, and that means one thing!

Zucchini!!!!

For those of you who plant gardens, there are probably zucchini growing out of your ears.

I have a solution: cookies!

These cookies take five minutes to throw together and they are so delicious! The edges have a nice crisp to them, and the middle is soft and moist. I used yellow zucchini in these, so feel free to use whatever zucchini you have on hand. Enjoy!

Cinnamon Spice Zucchini Cookies
1/2 cup butter, softened
3/4 cup sugar
1 large egg
1 teaspoon vanilla
1 1/2 cups shredded zucchini (about 1 medium zucchini)
1 1/2 cups flour
1/2 teaspoon baking soda
1/2 teaspoon salt
1/2 teaspoon nutmeg
1 cup quick oats
3/4 cup cinnamon chips

Preheat oven to 350 degrees. Lightly grease two baking sheets. Cream together the butter and sugar. Add in egg and vanilla and mix well. Stir in the zucchini until well combined. Mix in the flour, baking soda, salt, and nutmeg until well combined. Stir in the oats and cinnamon chips. Drop by rounded tablespoon onto the baking sheets. Bake for 9 to 11 minutes, until the edges are light golden brown. Let cool on the baking sheet for a few minutes and enjoy! Makes 2 dozen.

Adapted from verybestbaking.com

Saturday, March 9, 2013

Easter Bunny Cake

My husband and I joke that my family's traditions are centered around food, while his family's traditions are centered around games. My family likes to eat and talk around the table, while his family likes to play and talk around the table.
 
Since Easter (and hopefully Spring) is right around the corner, I wanted to share my family's traditional Easter dessert.....an Easter Bunny cake!


It's so simple to put together, but looks so cute! Let the kids help decorate it to make it a family activity.
 
Start by making a cake (I just always use a cake mix), any flavor. Bake the cake in two 8" pans, according to the directions on the cake mix box. Allow the cakes to cool completely before assembling the bunny.
One cake round will be the bunny's head. The other cake round will be the bunny's ears and bowtie. Cut the cake along the dotted lines as demonstrated:

Arrange the cake pieces on a cookie sheet. Frost the cake with desired frosting. I always use white frosting to get a white bunny. Immediately after frosting the cake, sprinkle coconut over the cake to give the bunny a fluffy effect.  I like to color some of the coconut pink for the insides of the bunny's ears. Give the bunny a face and whiskers with the candy of your choosing. Decorate the bowtie with candy. Admire your cute Easter bunny, and then dig in! ;)


Friday, February 22, 2013

Best Ever Brown Butter Chocolate Chip Cookies


My husband and I used to be on opposite sides of the Great Chocolate Chip Cookie Debate.

Chewy vs. Crispy

I am on the chewy side. I love a nice crisp on the outer edges, but the inside needs to be chewy! My husband, however, was brought up on thick, crispy cookies made with shortening. I like that buttery, melt-in-your-mouth center, while my husband likes a crispy cookie to dip in milk.

After several years, lots of testing, and lots of tasting, I have finally created a recipe that has won my husband over to the dark side.....I mean, the chewy side.

Best Ever Brown Butter Chocolate Chip Cookies

12 tablespoons  butter (1 1/2 sticks)
1 1/2 cups brown sugar
1 egg + 1 egg yolk
1 tablespoon vanilla
2 cups flour
2 tablespoons cornstarch
1/2 teaspoon baking soda
1/2 teaspoon salt
1 cup semi-sweet chocolate chips (or more if you prefer)

First, you need to brown the butter. There are some great tutorials with pictures online, but essentially you melt the butter over medium high heat until it bubbles, foams, and the milk solids brown. It should have a nice nutty aroma to it. Allow the brown butter to cool for a few minutes. Then mix it with the brown sugar in a large bowl. Next stir in the egg, egg yolk, and vanilla until well combined. Stir in the dry ingredients until well combined. Stir in chocolate chips. Refrigerate the dough until firm; about an hour.
When ready to bake, preheat the oven to 325 degrees. Scoop the cookie dough onto a cookie sheet. Bake for 10-13 minutes (or if you have a husband that likes to dip his cookies in milk, bake for 14 minutes). The edges will look done, but the middle should look soft and puffy. Allow to cool on the cookie sheet for a few minutes, and then enjoy!

Adapted from Our Best Bites


Thursday, February 14, 2013

Chocolate Chip Cookie Dough Buddies


Muddy Buddies + the flavors of chocolate chip cookie dough = Addictive!

When my husband eats more of these than I do, you know it must be good.

Chocolate Chip Cookie Dough Buddies

1/2 cup powdered sugar
1/4 cup + 2 tablespoons flour
1/4 cup + 2 tablepsoons brown sugar
1/4 teaspoon salt
1/4 cup + 1 tablespoon mini chocolate chips
6 ounces white chocolate
1 teaspoon oil
3 cups Chex cereal (I used Rice Chex)

Measure out the Chex cereal in a large bowl. In a smaller bowl, mix together the sugars, flour, and salt. Mix well, making sure there are no lumps of brown sugar. Microwave the white chocolate in 30 second intervals until melted and smooth. Stir in the oil. Pour the chocolate over the Chex cereal and stir carefully until the cereal is well coated. Stir* in 1/4 cup mini chocolate chips until well distributed. Pour in the flour/sugar mixture and remaining chocolate chips until all the cereal is coated. Enjoy!

*Adding the chocolate chips at this stage ensures that the chips don't just sink to the bottom of the bowl if they were added with the flour/sugar mixture.

Saturday, January 26, 2013

Almond Joy Brownie Batter Cookies


It seems as if our family has been playing "musical colds." Have you played this game? One family member gets sick, passes it on to another family member, gets better, and picks up a different cold. We all just rotate between colds to the music of sneezing and coughing. And there are cough drops and Alka Seltzer as prizes. 

It's not a fun game. 

However, after weeks of playing this "game," I think we are finally (knock on wood) done!

In order to celebrate, I made cookies! Better yet, they are super easy cookies that start with a brownie mix! All the flavors of an Almond Joy in a chewy cookie!


See that delicious coconut filling? Yum.....

Almond Joy Brownie Batter Cookies
1 box brownie mix
2 eggs
1/4 cup oil
1/3 cup chopped almonds (or more if you prefer)
1/3 cup milk chocolate chips (or more if you prefer)
1/2 of a 14 oz. can of sweetened condensed milk
2 cups sweetened shredded coconut

Preheat oven to 375 degrees. Mix together the brownie mix, eggs, and oil until well combined. Stir in almonds and chocolate chips.

In a separate bowl, mix together the coconut and sweetened condensed milk.

Now, you can put these cookies together two different ways. You can scoop a large mound of cookie dough, flatten it in your hand, then scoop a smaller mound of the coconut mixture onto the cookie dough and wrap it up in the cookie dough. Or, you can scoop a mound of cookie dough onto a parchment lined cookie sheet, flatten it, then scoop some of the coconut mixture onto the dough, and place a smaller, flattened piece of cookie dough on top to cover it. Either way, these cookies will be on the larger side.

Cook on a parchment lined cookie sheet for 12 - 14 minutes, or until set. Let cool on the cookie sheet for a few minutes, and then enjoy! These are especially good when they are warm.

Adapted from bakerunlive.com

Sunday, December 30, 2012

Take 5 Cake Mix Bars

I hope everyone had a very merry Christmas! I know I certainly did. Lots of family and lots of food :) And Santa (my sweet husband) gave me this:
Isn't she a beauty? I was so excited to try it out! In honor of its first mixing, I created a sweet treat that I hope you'll enjoy as much as I did!

You get the salty pretzel, chewy caramel, creamy peanut butter, and delicious chocolate flavors of a Take 5 bar sandwiched in cake batter! 


Take 5 Cake Mix Bars
1 box yellow cake mix
2 eggs
1/3 cup butter, softened
2 tablespoons milk
2/3 cup broken pretzels
1/3 cup + 1/4 cup peanut butter
4 ounces cream cheese, room temperature
1 cup powdered sugar
1 1/4 cups caramel candies
1 cup chocolate chips

Preheat oven to 350 degrees. Mix together cake mix, 1 egg, butter, and milk until it comes together as a thick batter. Divide the batter in half. In one half of the batter, mix in the pretzel pieces. Press that mixture into a 9 x 13" pan that has been sprayed with cooking spray. Bake for 8 or 9 minutes, until the batter is barely set.

Next, cream together the other egg, peanut butter, cream cheese, and powdered sugar until smooth and creamy. Carefully spread that mixture over the pretzel mixture. For the caramel part, I used those caramel squares you can buy in bulk at the grocery store. Feel free to use whatever caramels you like. Since the caramel squares were pretty big, I cut them in half. Sprinkle the caramels over the peanut butter mixture. 


Sprinkle the chocolate chips over the peanut butter mixture, too. Feel free to be generous with the sprinkling :)


Now flatten little pieces of the remaining half of the cake batter to evenly cover the top of the bars. 


Bake for 18-20 more minutes. The cake batter on top should be golden and puffed. 


Let cool and enjoy!


Tuesday, December 11, 2012

Peppermint Pretzel Bark


I hope you enjoy this little something that I created. It's sweet, it's salty, and it's pepperminty! Can life get better? 

Here's your line-up of ingredients:
2 cups chocolate melting wafers
1 3/4 cups pretzels, broken into pieces
1 bag Hershey's candy cane kisses (minus a few because it's impossible to unwrap them without eating a few!)
Christmas sprinkles and/or M&M's for decorating

Let's take a closer look at these beauties....

Mmmmmm.......

Melt the milk chocolate in the microwave for 30 seconds at a time, stirring each time, until it's completely melted. Spread the chocolate onto a cookie sheet lined with parchment paper. Working quickly, press the pretzel pieces into the chocolate in an even layer. I noticed that the outside edges of the chocolate hardened first, so work your way from the outside in. Fit as many pretzel pieces as possible. The more, the better!

 Once the milk chocolate has hardened, unwrap the Hershey's candy cane kisses and melt in the microwave using the same technique as with the milk chocolate. Spread the kisses over the pretzels, and then decorate with Christmas sprinkles.

 So cheery and yummy! (I was tempted not to break it up into pieces and declare the whole piece as mine!)

 Once the candy cane kiss layer has hardened, break into pieces and enjoy!
 The pretzels add a nice crunch to the the bark, and the saltiness cuts some of the sweetness of the chocolate and kisses. Milk chocolate + candy cane kisses + pretzels = addicting!


Sour Patch Kid Cake

Every year for my husband's birthday, I make him a special cake. This year's edition was Sour Patch Kids! My husband can eat five pounds of sour patch kids in one sitting (but not be able to eat more than two brownies at a time. Go figure.), so let's just say that they are his favorite candy....and quite possibly his favorite food.

I started out by making a 9 x 13" cake, and two 9" round cakes. I had to eyeball the sour patch kid design and cut it out of the 9 x 13" cake. I then cut out pieces from the round cakes to add dimension to the sour patch kid's hair (or whatever that wavy thing is on top of its head), eyes, and mouth. I then frosted the entire cake. I made a batch of fondant and colored it green, and covered the cake with it. Here's the cake covered in fondant:

 I then colored some clear piping gel (you can buy a tub of it at WalMart) to make it green and painted it onto the cake to get that jelly-like effect. 

 It's not a sour patch kid without sugar, so I used sugar sprinkles to cover the sour patch kid. 

And there you have one happy sour patch kid...and one happy husband :)

Homemade Fondant

Let's be clear on one thing: store bought fondant is disgusting. Okay, now that we're all on the same page, let's discuss homemade fondant. Yes, you can make it at home, yes, it's easy, and yes, it tastes good! So let's try it, shall we?

In a large bowl, stir together 16 ounces of mini marshmallows, 2 tablespoons of water, and food coloring (if you want it colored). Microwave for 30 second intervals, stirring each time, until the marshmallows are completely melted. Don't cook the marshmallows for longer than needed, otherwise it will harden like candy. Next, stir in 1 pound of sifted powdered sugar. Once that's stirred in, measure out 1/2 cup of shortening and put an additional 1 pound of sifted powdered sugar on the counter. Here's where it gets messy: rub half of the shortening all over your hands. Dump the marshmallow mixture onto the powdered sugar on the counter. Now knead, knead, knead! Occasionally knead in some of the shortening until it's all used. After 5 -10 minutes of kneading, the fondant should be smooth and soft and ready to be used for decorating. If it seems too dry, add in water a tablespoon at a time. If it seems too wet and sticky, add in more powdered sugar. If you're not going to use it immediately, cover with plastic wrap and store in an airtight container for about a week.

Monkey Birthday Cake

My little Tommy loves monkeys. LOVES THEM. So when his first birthday rolled around, I thought I'd make a monkey birthday cake.
To make the monkey head, just prepare a boxed cake mix according to directions. Grease and flour a stainless steel bowl and fill it about 2/3 of the way with the cake batter. Bake at the recommended temperature. Baking time varies due to size of the bowl, so just keep an eye on it. I made a large monkey head using a large stainless steel bowl and about 3/4 of one boxed cake mix to decorate a 9 x 13" cake. I wanted Tommy to have his own small cake, so I used the rest of the cake mix and baked it in a small stainless steel bowl. I cut slits on the side of the head (that just sounds terrible, doesn't it?) and slid in an Oreo on each side for the ears. I decorated the large cake with banana runts.

Tommy's little cake


What did Tommy think of his cake?
He loved it :)

Friday, November 30, 2012

White Chocolate Ginger Mousse in Lace Tuile Cookies

Sometimes my days get hectic and I find myself eating whatever my toddler is eating....Goldfish crackers....applesauce....stale graham crackers....and by the end of the day, I just want something grown-up and elegant....so I make this:


So elegant...so grown-up...and thankfully so easy! Apricots (fresh or dried) also pair very well with the mousse if you'd rather not make the tuile cookies. 


White Chocolate Ginger Mousee
1 pt. cream
1 tsp. powdered ginger
1 tsp. unflavored gelatin, softened in 2 Tbl. cold water
½ pound of white chocolate, chopped

Bring half of the cream to a boil, and then remove from heat. Add the gelatin and stir until it has completely dissolved. Place the chocolate and powdered ginger in a large bowl and pour the hot liquid over it. Stir until the chocolate has melted. Cool the mixture until it begins to thicken. Whip the remaining cream to soft peaks and fold in. Refrigerate for at least one hour. Once chilled and firm, pipe into cooled tuile cookies and serve immediately.
From Wrigley Mansion


Lace Tuile Cookies
1/2 teaspoon salt 
1 cup light brown sugar 
1 cup light corn syrup 
1 cup plus 4 tablespoons all-purpose flour 
12 tablespoons unsalted butter, melted 
1/2 teaspoon pure vanilla extract 
1 cup crushed ginger snap cookies

 Preheat the oven to 350 degrees F. In a mixer with a whisk attachment, combine the salt, brown sugar, and corn syrup. Add the flour, butter, and vanilla extract, and mix well. Add the crushed ginger snaps and mix just to combine. Line a baking sheet with parchment paper. Drop large teaspoonfuls of batter onto the parchment paper, leaving plenty of room between them as the cookies will spread out as they bake to about 4-inches in diameter. Bake until the edges are browned, about 8 to 10 minutes. When done, the cookies will be bubbly and flat. Once the tuiles are baked, and while still hot but cool enough to hold together, individually peel the cookies off the parchment paper, and drape them over a rolling pin covered with parchment paper and leave them to cool. Repeat until all the cookie batter is used up. When cool, store carefully in an airtight container.