Saturday, March 16, 2013

Easter Wreath

I wanted to make an Easter wreath that didn't feature plastic eggs or Peeps (I love peeps a little too much to use them as a decoration...I have no self control when it comes to those cute sugary treats). I decided to try to make an Easter wreath with some purple ribbon instead.

 
I used an 8 inch foam wreath.
 
Then I wrapped ribbon around the entire wreath, using pins to secure the ribbon.

Then I cut about 10 inch pieces of ribbon. I folded the corners over on one end, and put a pin through it. Then I would randomly twist and arrange the ribbon to resemble petals and thread it onto the pin as I went along.


 Since the ribbon flowers were already on a pin, I simply pushed the pin into the foam wreath to secure it onto the wreath. I liked the look of having the flowers on just a section of the wreath, but I decided to cover the whole wreath in flowers.
 
 Here's the final product. I loved the way it turned out. Now I just need to figure out where to hang it...


St. Patrick's Day Frame

I have a frame that hangs in my kitchen that I use to switch out subway art for the different seasons. For St. Patrick's Day, I wanted to do something a little different. I had some cute shamrock cut outs, which became the inspiration for this frame.

This frame came together in a matter of minutes, and you can totally change it to match your style.

All you need is:
Frame with glass plate
Scrapbooking paper
St. Patrick's day (or any holiday) cut outs or decorations

Simply open up the back of the frame and lay down the decorations on the glass plate. I had to tape the rickrack to the edges of the frame so they would stay in place. I also put pieces of tape on the backside of the shamrocks, so when I layed the paper down on them, they would stay in place and not slide down. Then close up the frame, hang it up, and enjoy!

Saturday, March 9, 2013

Easter Bunny Cake

My husband and I joke that my family's traditions are centered around food, while his family's traditions are centered around games. My family likes to eat and talk around the table, while his family likes to play and talk around the table.
 
Since Easter (and hopefully Spring) is right around the corner, I wanted to share my family's traditional Easter dessert.....an Easter Bunny cake!


It's so simple to put together, but looks so cute! Let the kids help decorate it to make it a family activity.
 
Start by making a cake (I just always use a cake mix), any flavor. Bake the cake in two 8" pans, according to the directions on the cake mix box. Allow the cakes to cool completely before assembling the bunny.
One cake round will be the bunny's head. The other cake round will be the bunny's ears and bowtie. Cut the cake along the dotted lines as demonstrated:

Arrange the cake pieces on a cookie sheet. Frost the cake with desired frosting. I always use white frosting to get a white bunny. Immediately after frosting the cake, sprinkle coconut over the cake to give the bunny a fluffy effect.  I like to color some of the coconut pink for the insides of the bunny's ears. Give the bunny a face and whiskers with the candy of your choosing. Decorate the bowtie with candy. Admire your cute Easter bunny, and then dig in! ;)


Friday, March 8, 2013

"Leftover Rotisserie" Chicken

I don't know about you, but I feel like I find so many "quick and healthy" dinner recipes that call for "leftover rotisserie chicken." I want to laugh every time I read "leftover rotisserie chicken." It seems like some recipes assume we eat rotisserie chicken every other day so we will always have leftovers. And since I do not eat rotisserie chicken every other day, I would have to cook the chicken for the recipe that night, making that recipe a lot less "quick."

Until.

Until I realized that I was spending waaaaay too much time every night handling yucky raw chicken. Now I cook the chicken all at once, and then freeze it. So now I have "leftover rotisserie" chicken whenever I need it!

Not only is this recipe so simple and easy, but it saves so much time during the week. And the chicken is super tender!

"Leftover Rotisserie" Chicken
Any size package of fresh (not frozen) chicken breasts
Chicken broth (use a good quality kind)

Preheat the oven to 350 degrees. Trim the excess fat from the chicken and place in a glass pan. Do not overcrowd the chicken. Pour enough chicken broth over the chicken so that it is 1/2 inch high in the pan.


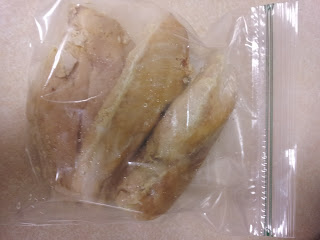
Cover the pan tightly with foil. Cook for one hour. When finished cooking, remove the chicken from the oven, but don't remove the foil for 15 minutes. After 15 minues, remove the foil and let the chicken cool to room temperature. Place the chicken in freezer safe resealable bags and store in the freezer.

When you're ready to use the chicken, just place it on a plate and microwave for a minute or two, until it is thawed enough to be cut through.

Monday, March 4, 2013

Creamy Chicken Corn Chowder with a Kick

My little guy loves keys. Loves them. The first thing he does when Daddy comes home is to reach in his pockets and pull out his keys. He knows which keys go to Daddy's car, and which keys go to Mommy's car (he likes Daddy's car keys the most). And, of course, he knows where the panic button is on each set of keys.
Tonight as I was tucking him into his crib, he rolled over and I heard a clink. Puzzled, I felt around his blanket and pulled out....the keys to my car. I have no idea when he grabbed them, but he kept them hidden from me while I fed him his bottle and rocked him. Apparently he was hoping to snuggle with them tonight....or take the car for a midnight spin ;)

So for those of you who need some spice in their food like my son needs keys, then this soup is for you. It's a comfort food with a spicy kick!


Cream Chicken Corn Chowder with a Kick
1 onion, diced
4 tablespoons butter
1/3 cup flour
3 cups chicken broth
1 cup milk
3 cups diced potatoes
1 can creamed corn
1 can corn, drained
4 slices bacon, cooked and crumbled
1 small can green chiles
2 cups chicken, cooked and shredded
1/2 teaspoon garlic powder
Salt and pepper to taste
Several hearty dashes of hot sauce

In a large pot, melt the butter over medium high heat. Add the onions and cook until softened. Add the flour, cook for one minute, stirring continuously. Add in the broth, milk, potatoes, creamed corn, corn, bacon, chiles and garlic powder. Cover the pot and let the soup simmer for about 25 minutes, or until the potatoes are tender. Don't let the soup come to a full boil. Once the potatoes are tender, stir in the chicken. Season with the salt, pepper, and hot sauce. Don't be shy with the hot sauce!  Stir to incorporate the seasonings, and enjoy!