Sunday, December 30, 2012

Take 5 Cake Mix Bars

I hope everyone had a very merry Christmas! I know I certainly did. Lots of family and lots of food :) And Santa (my sweet husband) gave me this:
Isn't she a beauty? I was so excited to try it out! In honor of its first mixing, I created a sweet treat that I hope you'll enjoy as much as I did!

You get the salty pretzel, chewy caramel, creamy peanut butter, and delicious chocolate flavors of a Take 5 bar sandwiched in cake batter! 


Take 5 Cake Mix Bars
1 box yellow cake mix
2 eggs
1/3 cup butter, softened
2 tablespoons milk
2/3 cup broken pretzels
1/3 cup + 1/4 cup peanut butter
4 ounces cream cheese, room temperature
1 cup powdered sugar
1 1/4 cups caramel candies
1 cup chocolate chips

Preheat oven to 350 degrees. Mix together cake mix, 1 egg, butter, and milk until it comes together as a thick batter. Divide the batter in half. In one half of the batter, mix in the pretzel pieces. Press that mixture into a 9 x 13" pan that has been sprayed with cooking spray. Bake for 8 or 9 minutes, until the batter is barely set.

Next, cream together the other egg, peanut butter, cream cheese, and powdered sugar until smooth and creamy. Carefully spread that mixture over the pretzel mixture. For the caramel part, I used those caramel squares you can buy in bulk at the grocery store. Feel free to use whatever caramels you like. Since the caramel squares were pretty big, I cut them in half. Sprinkle the caramels over the peanut butter mixture. 


Sprinkle the chocolate chips over the peanut butter mixture, too. Feel free to be generous with the sprinkling :)


Now flatten little pieces of the remaining half of the cake batter to evenly cover the top of the bars. 


Bake for 18-20 more minutes. The cake batter on top should be golden and puffed. 


Let cool and enjoy!


Tuesday, December 11, 2012

Peppermint Pretzel Bark


I hope you enjoy this little something that I created. It's sweet, it's salty, and it's pepperminty! Can life get better? 

Here's your line-up of ingredients:
2 cups chocolate melting wafers
1 3/4 cups pretzels, broken into pieces
1 bag Hershey's candy cane kisses (minus a few because it's impossible to unwrap them without eating a few!)
Christmas sprinkles and/or M&M's for decorating

Let's take a closer look at these beauties....

Mmmmmm.......

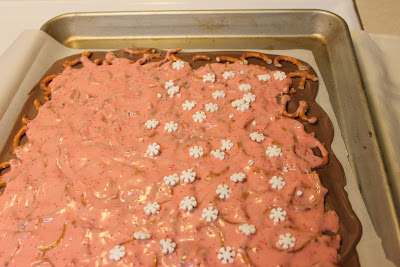
Melt the milk chocolate in the microwave for 30 seconds at a time, stirring each time, until it's completely melted. Spread the chocolate onto a cookie sheet lined with parchment paper. Working quickly, press the pretzel pieces into the chocolate in an even layer. I noticed that the outside edges of the chocolate hardened first, so work your way from the outside in. Fit as many pretzel pieces as possible. The more, the better!

 Once the milk chocolate has hardened, unwrap the Hershey's candy cane kisses and melt in the microwave using the same technique as with the milk chocolate. Spread the kisses over the pretzels, and then decorate with Christmas sprinkles.

 So cheery and yummy! (I was tempted not to break it up into pieces and declare the whole piece as mine!)

 Once the candy cane kiss layer has hardened, break into pieces and enjoy!
 The pretzels add a nice crunch to the the bark, and the saltiness cuts some of the sweetness of the chocolate and kisses. Milk chocolate + candy cane kisses + pretzels = addicting!


Sour Patch Kid Cake

Every year for my husband's birthday, I make him a special cake. This year's edition was Sour Patch Kids! My husband can eat five pounds of sour patch kids in one sitting (but not be able to eat more than two brownies at a time. Go figure.), so let's just say that they are his favorite candy....and quite possibly his favorite food.

I started out by making a 9 x 13" cake, and two 9" round cakes. I had to eyeball the sour patch kid design and cut it out of the 9 x 13" cake. I then cut out pieces from the round cakes to add dimension to the sour patch kid's hair (or whatever that wavy thing is on top of its head), eyes, and mouth. I then frosted the entire cake. I made a batch of fondant and colored it green, and covered the cake with it. Here's the cake covered in fondant:

 I then colored some clear piping gel (you can buy a tub of it at WalMart) to make it green and painted it onto the cake to get that jelly-like effect. 

 It's not a sour patch kid without sugar, so I used sugar sprinkles to cover the sour patch kid. 

And there you have one happy sour patch kid...and one happy husband :)

Homemade Fondant

Let's be clear on one thing: store bought fondant is disgusting. Okay, now that we're all on the same page, let's discuss homemade fondant. Yes, you can make it at home, yes, it's easy, and yes, it tastes good! So let's try it, shall we?

In a large bowl, stir together 16 ounces of mini marshmallows, 2 tablespoons of water, and food coloring (if you want it colored). Microwave for 30 second intervals, stirring each time, until the marshmallows are completely melted. Don't cook the marshmallows for longer than needed, otherwise it will harden like candy. Next, stir in 1 pound of sifted powdered sugar. Once that's stirred in, measure out 1/2 cup of shortening and put an additional 1 pound of sifted powdered sugar on the counter. Here's where it gets messy: rub half of the shortening all over your hands. Dump the marshmallow mixture onto the powdered sugar on the counter. Now knead, knead, knead! Occasionally knead in some of the shortening until it's all used. After 5 -10 minutes of kneading, the fondant should be smooth and soft and ready to be used for decorating. If it seems too dry, add in water a tablespoon at a time. If it seems too wet and sticky, add in more powdered sugar. If you're not going to use it immediately, cover with plastic wrap and store in an airtight container for about a week.

Monkey Birthday Cake

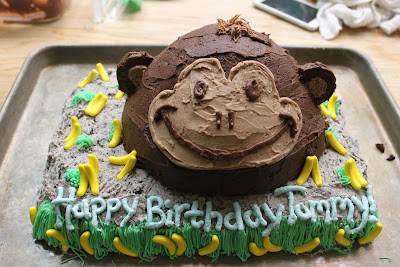
My little Tommy loves monkeys. LOVES THEM. So when his first birthday rolled around, I thought I'd make a monkey birthday cake.
To make the monkey head, just prepare a boxed cake mix according to directions. Grease and flour a stainless steel bowl and fill it about 2/3 of the way with the cake batter. Bake at the recommended temperature. Baking time varies due to size of the bowl, so just keep an eye on it. I made a large monkey head using a large stainless steel bowl and about 3/4 of one boxed cake mix to decorate a 9 x 13" cake. I wanted Tommy to have his own small cake, so I used the rest of the cake mix and baked it in a small stainless steel bowl. I cut slits on the side of the head (that just sounds terrible, doesn't it?) and slid in an Oreo on each side for the ears. I decorated the large cake with banana runts.

Tommy's little cake


What did Tommy think of his cake?
He loved it :)

Saturday, December 8, 2012

Roller Coasters

Growing up, my mom would make roller coasters (a.k.a. German pancakes or Dutch babies) for breakfast every Sunday morning. We kids knew when she was making them because we could hear the blender going. You wanted to be the kid that was up first, so you got the biggest portion of roller coasters. They're called roller coasters because when you take it out of the oven, there are bumps.

This dish comes together so quickly: just a quick mix in the blender, 15 minutes in the oven, and you have a hot, buttery, and delicious breakfast!


Roller Coasters
6 eggs
1 cup milk
1 cup flour
1/8 teaspoon salt
6 tablespoons butter or margarine

Melt the butter in a 9 x 13" pan in a 450 degree oven. Make sure the butter is completely melted, but not burned. Blend all other ingredients in the blender. Pour batter into the pan and bake for 15 minutes. Serve with butter, syrup, jam, or powdered sugar.
This recipe can also be halved and baked in a 2 quart dish.
Recipe from our good friend Charla

Play Dough

Since it's beginning to get cold outside, I've been trying to come up with good indoor activities....for a super active one year old...in an apartment. It's not easy. However, I remembered playing with play dough that my mom would make, so I decided to make some for my little guy. There are so many variations out there, but I wanted a recipe that had salt in it, so Tommy wouldn't want to eat it. This recipe was so simple, so easy, and the texture turned out great.

Play Dough!
2 cups warm water
2 cups flour
1 cup salt 
2 tablespoons oil
a few drops of food coloring

Mix everything together over low heat. Continue stirring until the flour gets "cooked" and the play dough comes together in a ball. Allow to cool and enjoy! The play dough can be stored for several weeks in an airtight container in the fridge. 


Tommy loved the play dough, and I loved how easy it was to clean up!